케이블을 늘 연결하는게 불편했는데 무선으로도 연결이 된다.
속도는...읍읍
1. 휴대폰과 노트북을 같은 wifi로 연결한다.
2. 휴대폰-노트북을 usb 케이블로 연결한다.
3. adb.exe과 scrcpy.exe파일이 있는 폴더경로로 cmd창을 연다
그 폴더 주소창에서 cmd 치면 폴더경로로 cmd창이 열림
4. cmd창에 명령어 두 번 입력
adb tcpip 5555
restarting in TCP mode port: 5555 라고 반응이 온다.
만약 error가 뜬다면 휴대폰 개발자옵션에 다시 가서 usb디버깅옵션 껐다가 다시 활성화 하고 폰에서도 이 장치에서 항상연결 꾹꾹 확인 눌러준다.
adb connect 192.168.0.6:5555
connected to 192.168.0.6:5555 라고 반응이 오면 끝.
여기서 192.168.0.6 는 휴대폰 Wifi ip주소이고,
확인방법은 설정 - wifi - 현재네트워크에서 연결된 wifi 오른쪽 톱니바퀴 눌러서
아래쪽 더보기 누르면 맨 아래에 ip주소가 보임
5. 케이블 제거하고 scrcpy.exe 실행하면 이제 무선으로 연결 똭!
더 자세한 연결설정은 scrcpy 깃허브 페이지에 잘 나와 있음.
https://github.com/Genymobile/scrcpy
등등등 겁나 많다..
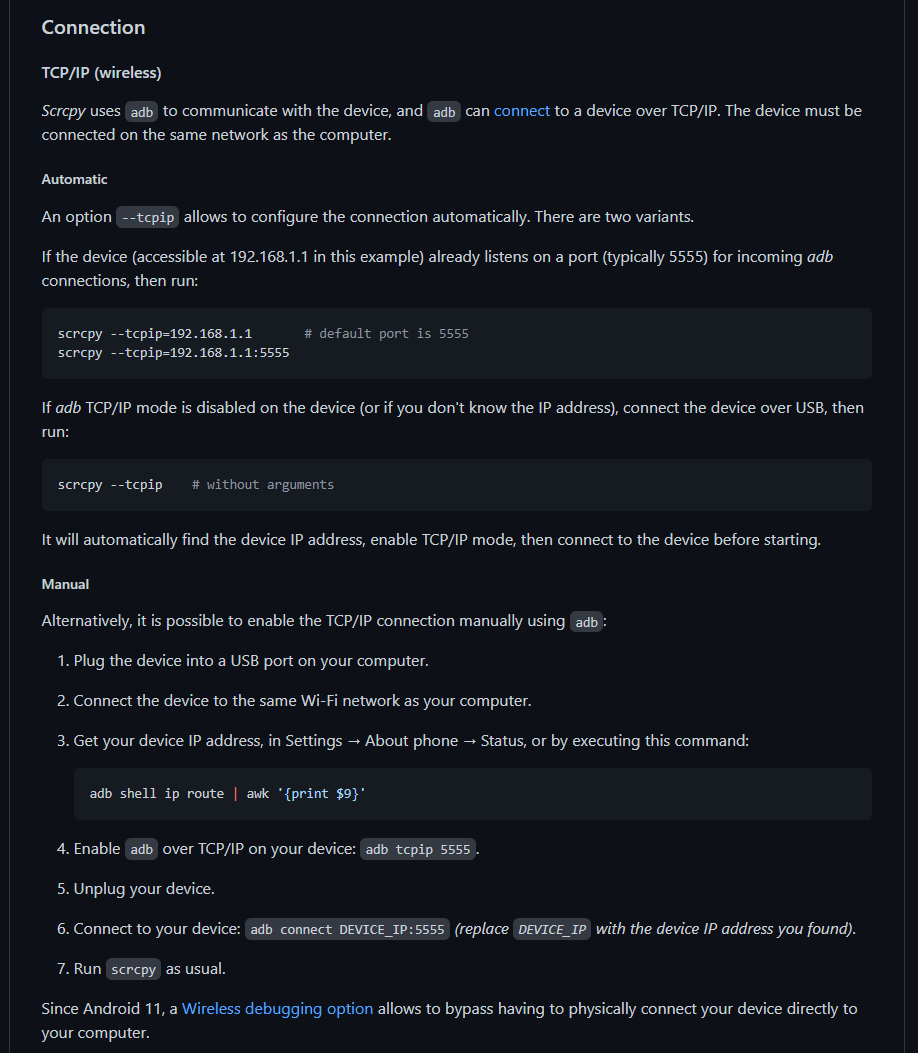
Connection
TCP/IP (wireless)
Scrcpy uses adb to communicate with the device, and adb can connect to a device over TCP/IP. The device must be connected on the same network as the computer.
Automatic
An option --tcpip allows to configure the connection automatically. There are two variants.
If the device (accessible at 192.168.1.1 in this example) already listens on a port (typically 5555) for incoming adb connections, then run:
scrcpy --tcpip=192.168.1.1 # default port is 5555 scrcpy --tcpip=192.168.1.1:5555
If adb TCP/IP mode is disabled on the device (or if you don't know the IP address), connect the device over USB, then run:
scrcpy --tcpip # without arguments
It will automatically find the device IP address, enable TCP/IP mode, then connect to the device before starting.
Manual
Alternatively, it is possible to enable the TCP/IP connection manually using adb:
Plug the device into a USB port on your computer.Connect the device to the same Wi-Fi network as your computer.Get your device IP address, in Settings → About phone → Status, or by executing this command:adb shell ip route | awk '{print $9}'Enable adb over TCP/IP on your device: adb tcpip 5555.Unplug your device.Connect to your device: adb connect DEVICE_IP:5555 (replace DEVICE_IP with the device IP address you found).Run scrcpy as usual.
Since Android 11, a Wireless debugging option allows to bypass having to physically connect your device directly to your computer.
If the connection randomly drops, run your scrcpy command to reconnect. If it says there are no devices/emulators found, try running adb connect DEVICE_IP:5555 again, and then scrcpy as usual. If it still says there are none found, try running adb disconnect, and then run those two commands again.
It may be useful to decrease the bit-rate and the resolution:
scrcpy --bit-rate 2M --max-size 800 scrcpy -b2M -m800 # short version
Multi-devices
If several devices are listed in adb devices, you can specify the serial:
scrcpy --serial 0123456789abcdef scrcpy -s 0123456789abcdef # short version
The serial may also be provided via the environment variable ANDROID_SERIAL (also used by adb).
If the device is connected over TCP/IP:
scrcpy --serial 192.168.0.1:5555 scrcpy -s 192.168.0.1:5555 # short version
If only one device is connected via either USB or TCP/IP, it is possible to select it automatically:
# Select the only device connected via USB scrcpy -d # like adb -d scrcpy --select-usb # long version # Select the only device connected via TCP/IP scrcpy -e # like adb -e scrcpy --select-tcpip # long version
You can start several instances of scrcpy for several devices.
Autostart on device connection
You could use AutoAdb:
autoadb scrcpy -s '{}'
Tunnels
To connect to a remote device, it is possible to connect a local adb client to a remote adb server (provided they use the same version of the adb protocol).
Remote ADB server
To connect to a remote adb server, make the server listen on all interfaces:
adb kill-server adb -a nodaemon server start # keep this open
Warning: all communications between clients and the adb server are unencrypted.
Suppose that this server is accessible at 192.168.1.2. Then, from another terminal, run scrcpy:
# in bash export ADB_SERVER_SOCKET=tcp:192.168.1.2:5037 scrcpy --tunnel-host=192.168.1.2
:: in cmd set ADB_SERVER_SOCKET=tcp:192.168.1.2:5037 scrcpy --tunnel-host=192.168.1.2
# in PowerShell $env:ADB_SERVER_SOCKET = 'tcp:192.168.1.2:5037' scrcpy --tunnel-host=192.168.1.2
By default, scrcpy uses the local port used for adb forward tunnel establishment (typically 27183, see --port). It is also possible to force a different tunnel port (it may be useful in more complex situations, when more redirections are involved):
scrcpy --tunnel-port=1234
SSH tunnel
To communicate with a remote adb server securely, it is preferable to use an SSH tunnel.
First, make sure the adb server is running on the remote computer:
adb start-server
Then, establish an SSH tunnel:
# local 5038 --> remote 5037 # local 27183 <-- remote 27183 ssh -CN -L5038:localhost:5037 -R27183:localhost:27183 your_remote_computer # keep this open
From another terminal, run scrcpy:
# in bash export ADB_SERVER_SOCKET=tcp:localhost:5038 scrcpy
:: in cmd set ADB_SERVER_SOCKET=tcp:localhost:5038 scrcpy
# in PowerShell $env:ADB_SERVER_SOCKET = 'tcp:localhost:5038' scrcpy
To avoid enabling remote port forwarding, you could force a forward connection instead (notice the -L instead of -R):
# local 5038 --> remote 5037 # local 27183 --> remote 27183 ssh -CN -L5038:localhost:5037 -L27183:localhost:27183 your_remote_computer # keep this open
From another terminal, run scrcpy:
# in bash export ADB_SERVER_SOCKET=tcp:localhost:5038 scrcpy --force-adb-forward
:: in cmd set ADB_SERVER_SOCKET=tcp:localhost:5038 scrcpy --force-adb-forward
# in PowerShell $env:ADB_SERVER_SOCKET = 'tcp:localhost:5038' scrcpy --force-adb-forward
Like for wireless connections, it may be useful to reduce quality:
scrcpy -b2M -m800 --max-fps 15
-끝-
ps. 혹~시 이 글을 즐겁게 보셨다면😄
하트❤️ + 광고 한 번씩 👇클릭 부탁드려요.
글쓴이에게 떡고물이 떨어집니다 :)

-진짜 끝-
'메모장 > 생산성' 카테고리의 다른 글
| 원노트 사진위에 그리기, 필기, 주석 남기고 그 위에 텍스트 엔터치면 그린것들이 고정이 안되고 밀림 / 워드는 됨 (0) | 2022.10.06 |
|---|---|
| Windows 11에서 Bluetooth 장치(이어폰등) 쉽게 연결하는 방법 (아이콘+단축키) (1) | 2022.09.20 |
| 컴퓨터 버벅일때, 윈도우11 재설치 후, 기본세팅 프로세스 정리 (2) | 2022.09.08 |
| 윈도우11 C드라이브 논리용량 간단하게 확장하는 방법 (0) | 2022.08.31 |
| 10만원 미만 썬더볼트3에 4k 60hz 트리플모니터 지원되는 "코드웨이 USB C타입 12in1 허브" (썬더볼트3 되는데 제목에 안씀 ㅋㅋ) (1) | 2022.07.13 |